Using new nimbleDataPro2 (NDP2) in AmiBroker is now easier than before. You can start running NDP2 in 2 minutes as explained below.

- Download and Install NimbleDataPro2
Install NimbleDataPro2 normally on your desktop. During installation, you can choose AmiBroker Edition (32 bit / 64 bit)
- Register NimbleDataPro2
Create new database in AmiBroker using NimbleData as data source. First time users will be asked to register their copy. Once users activates their copy by clicking on the activation link received over email, they can start using the product immediately. Free Trial is automatically activated to first time users.
- Start Using NimbleDataPro2
Add symbols and start using NimbleDataPro2 right away.
In next articles, you will find detailed information with step-by-step guide for each of the steps above.
Download and run installer. Installation is straight forward, as shown below.


It is important to click on ‘Finish’ button to finish the installation process.
- After installation, you will need to create AmiBroker Database. This is a one-time process. Click on File>>New>>Database in AmiBroker menu as shown below.

- Enter new database name and click on ‘Create’ Button.

- From the ‘Data Source’ drop-down box, select ‘Nimbledata RT data Plug-in’.

If you do not see nimbleData Plugin under ‘Data Source’, please check following :
- Check AmiBroker Path : Please check if you have installed NimbleDataPro2 for the same AmiBroker which is started now. To verify, navigate to \Plugins directory of the AmiBroker which should contain ‘NimbledataRT.dll’ file. If required, re-install NimbleDataPro2 by selecting appropriate AmiBroker path during installation.
- Check AmiBroker Edition : Please check if you have selected correct AmiBroker Edition (32 bit or 64 bit) at the time of installation. 32bit NimbleDataPro2 will not be visible under 64bit AmiBroker. Similarly, 64bit NimbleDataPro2 will not be visible under 32bit AmiBroker. You can know the exact AmiBroker Version from AmiBroker menu Help>>About as shown below.

If required, re-install NimbleDataPro2 by selecting appropriate AmiBroker path during installation.
- Visual Studio Redistributable : If you are using older Operating System then you will need to install appropriate Visual Studio Redistributable. To do this, please :
- Close AmiBroker
- Navigate to C:\NimbleDataPro2\prerequisites You will find 2 directories here : x86 & x64.
- If you are using 32bit AmiBroker, run exe from C:\NimbleDataPro2\prerequisites\x86 directory. This will install the necessary Visual Studio files on your computer. Complete installation normally.
- If you are using 64bit AmiBroker, run exe from C:\NimbleDataPro2\prerequisites\x64 directory. This will install the necessary Visual Studio files on your computer. Complete installation normally.
- Start AmiBroker and continue with new database creation.
- Enter 150000 for ‘Number of bars’ and ‘Tick’ or ‘1 Minute’ as the Base time Interval as shown below and click on ‘Intraday Settings’ button.

Choosing ‘Tick’ as Base Time Interval : If you want to see range bars or timeframes smaller than 1 minute, you should choose ‘Tick’ as Base Time Interval.
Choosing ‘1 Minute’ as Base Time Interval : If you do not want to see timeframes smaller than 1 minute, you can choose ‘1 Minute’ as Base Time Interval.
Notes :
- Irrespective of whether you choose ‘Tick’ or ‘1 Minute’, the data will be updating tick by tick (1 second).
- Irrespective of whether you choose ‘Tick’ or ‘1 Minute’, the data is delivered realtime without any delay.
- Since each minute can contain 60 ticks, it may take little more time to backfill symbols with ‘Tick’ as base time interval. For same reason, bandwidth consumption is higher with ‘Tick’ as base time interval.
- Under ‘Intraday Settings’, make settings as shown below, click OK.

5. Ensure Database Settings as shown in the main screen below and click OK.

On clicking OK, it will show you license status screen as shown below.

- If you are first time user, it will ask you to register – as shown below. Click on ‘Register’ button

7. Enter your details and click on ‘REGISTER’ button. All fields are mandatory. It is important that you write correct email id and mobile number because activation link is sent over email / mobile.

8. If registration is successful, it shows message as below.

9. Check your email, click on activation link received (or copy – paste in your browser) to activate your free trial. Once done, click on NEXT button as shown below:

- Once license is activated, it will show message with expiry date of subscription as shown below:

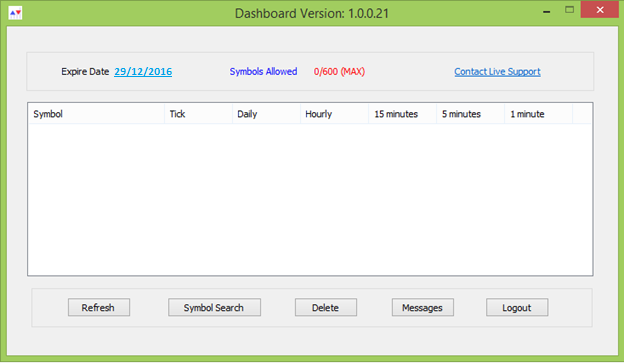
- Once you click on OK above, NimbleDataPro2 Dashboard will be shown. Now you can add symbols in AmiBroker and see their charts.
To view the chart after creating database, user needs to add symbol in AmiBroker as shown below, as explained in next articles.
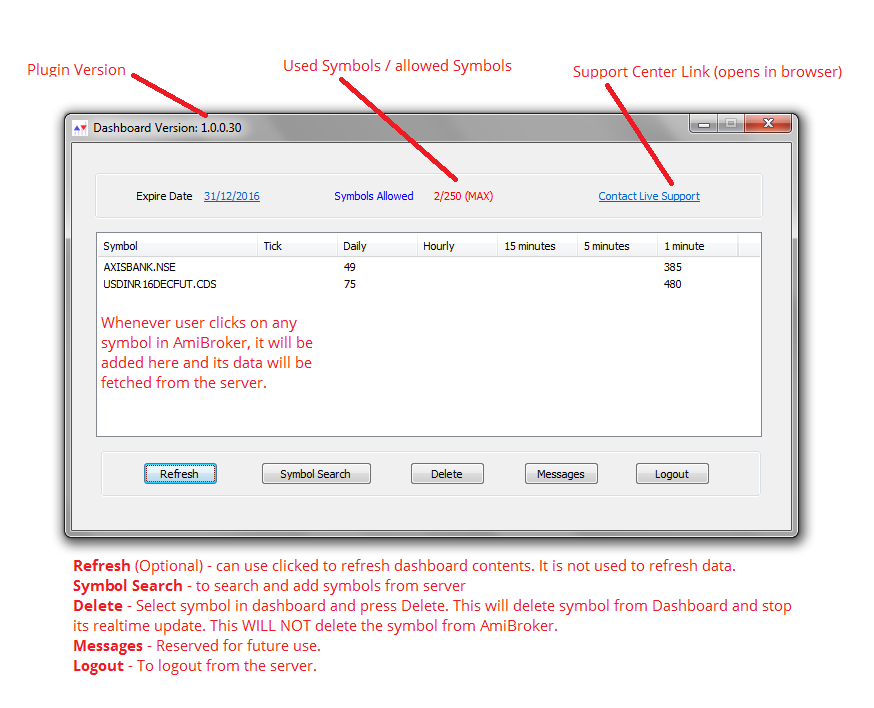
On clicking the Expiry Date (on 31/12/2016 as per above screenshot), it will show User Info – as shown below.

Symbol Search : When clicked on ‘Symbol Search’ button in Dashboard, it opens a new window as shown below. You can use this window to search for available symbols on the server and add them to AmiBroker – as shown below.

- Enter at least 3 characters to be searched in textbox
- Select ‘Exchange’
- Hit ‘Search’ button
- From displayed results, doubleclick to add any symbol(s) to AmiBroker
- Click OK to close ‘symbol search’ window
- In AmiBroker, click on File>>Database Settings>>Configure button.
- The added symbols will be visible under Symbols window in AmiBroker
To view chart of any symbol, you will first need to add symbols to AmiBroker. It is strongly recommended to use Dashboard>>Symbol Search window to add symbols to AmiBroker – as explained below.
Symbol addition through Dashboard :
- In DashBoard, click on ‘Symbol Search’ Button.
- In the window that opens, select Exchange & enter minimum 3 starting characters of the symbol you are interested in, select exchange and click Search. All related symbols will be displayed in Result area.
- Now doubleclick on interested symbols to add them to the list (or select Symbol and click on Add> button).
- Click OK
- Now all newly added symbols will be displayed in DashBoard.
- Important : Go to AmiBroker menu File >> Database settings and click on Configure button
- Now newly added symbols will be visible under Symbol tab in AmiBroker.
- Now you can select any of these symbols to view their charts
Manual Symbol addition in AmiBroker :
To manually add symbol in AmiBroker (through Symbol>>New Menu or through Symbols Toolbar), you must know the symbol naming conventions for each exchange. The same is explained below.
Symbol Naming Conventions :

Notes :
- When adding manually, enter all symbols in UPPERCASE.
- If any symbol shows ERR in dashboard, it means either that symbol is expired or spelled incorrectly.

Once the symbol are added in AmiBroker, click on any symbol name in to view its char.

To use NimbleDataPro2, each user must register before he can use the product (paid as well as trial user). Registration is a one time process and it creates a license for the user. Whenever user wants to use NimbleDataPro2 on another computer, he will need to transfer his license to another computer. In NimbleDataPro2, license transfer is fully automatic.
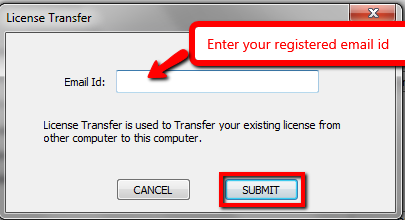
Planned License Transfer : Here, user first deactivates his license from existing computer. Then he installs / runs NimbleDataPro2 on another computer and activates NimbleDataPro2. The steps are :
Click on ‘Expiry Date’ to open ‘User Info’ window. Here, click on ‘License Transfer’ button as shown below.

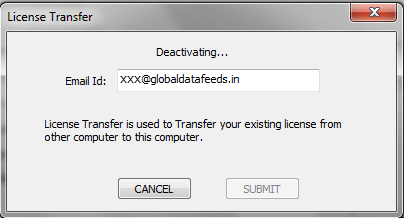
- Enter your registered email id and press ‘SUBMIT’ button

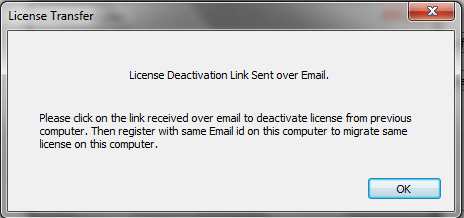
- Once submitted, a deactivation link will be sent to your registered email id – as shown below.


- Click on the deactivation link received over email. Once clicked, your license will be deactivated from current computer.
- Once license is deactivated, you can activate it on any computer (including old computer) by following registration process as explained under Configuration
Unplanned License Transfer : Here user is not near his regular computer where NimbleDataPro2 is installed but he wants to use NimbleDataPro2 on another computer. Here are the steps he should follow.
- Install NimbleDataPro2 on new computer as explained under installation
- Create a database in AmiBroker on new computer as explained under Configuration Follow till step 7.
- Click on ‘License Transfer’ button in the registration dialog as shown below.

- Enter your registered email id and hit ‘SUBMIT’ button.
- Once submitted, a deactivation link will be sent to your registered email id – as shown below.
- Click on the deactivation link received over email. Once clicked, your license will be deactivated from old You can now use it on current computer.
- Now follow registration process from step 8 under Configuration. Register NimbleDataPro2 on new computer.
Important : Use same email id as used on the old computer to register on new computer. This will map your subscription settings on your new computer automatically.